During the planning process, I had a long list of DIY projects that were essential to create a vintage Provencal train station at the reception. Somehow the list continued to expand instead of shrink. It was probably due to the fact that I kept perusing wedding blogs after all the decisions had been made. So, my tip is, if you don’t want to add more work to your wedding planning, then stay off the wedding blogs and Pinterest!
This bunting banner was one of those projects that I added at the last minute, and could have been easily omitted and no one would have been none the wiser. But then I wouldn’t have been able to get a shot of this awesome get-away photo!
Photography credit: Inge Kathleen Photography
I loved the concept of this shot because Mr. M and I loooooooove to travel and we love to explore new towns on foot. It only seemed fitting that we would walk off after the ceremony instead of driving off, especially in the foreign environment we were in.
The project took very little time and I just used scraps of burlap from my table runners, so it cost nothing to do. Here is the supply list:
1 - sheet of blank or scratch paper
Burlap
Pinking shears
Twine
Hot glue gun and glue sticks
White paint
Letter stencils
Foam brush
10 - Aluminum cans

Step 1: Create a template. When working with repetitive items, I like to start with a template. This one is easy to make. Just take a piece of 8.5 x 11 bond paper (I used scratch paper because there was no need to waste a perfectly good piece of paper just to cut up for a one time project), fold in half, and cut diagonally from corner to corner. Unfold and you have a triangular pattern. You may need to adjust the size of the template according to the size of bunting you’ll want.
Step 2: Cut the triangles. Fold your fabric (I used burlap) and lay the long edge of the template at the fold (as shown in Step 1). There’s no need to trace the template onto the fabric. Pinning the template to the fabric is good enough. Cutting with pinking shears is the best way to avoid fraying. This way, you don’t have to hem the edges - why do more work than you need to, right? Plus, they’re just really fun to use.
Step 3: Lay out the triangles. Unfold the triangles and lay them out. Then lay the twine across the folds. If you plan to use the bunting for the get-away like we did, make sure you add extra twine on both ends to tie the cans with. Fold the triangles together again with the twine between the folds. Hot glue the triangles together.

I cut my triangles on the larger side so that the letters could be seen from far away in the get away shot. The letters were painted on with a foam brush using the same stencils I made for the table runners. For traveling purposes, I didn’t attach the aluminum cans until we got to France. *Forgive my messy workstation in the above photo.*
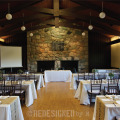
After the get-away shot in France, we were able to use the bunting again as a backdrop at the dinner after the ceremony (sans aluminum cans) and on the guest table at the reception. The aluminum cans were repurposed as flower vases for dinner after the ceremony.
Total Time: About 30-45 minutes, not including the messed up version I made.
Total Cost: Nothing. All materials were leftover from other wedding and house projects.
X
If you missed any part of the Project Wedding series, you can view them here:
How It All Began
The Ceremony
Pom Poms and Fans
Tin Punched Candle Holders
No Sew “Just Married” Bunting
The Dress
DIY Hair Fascinator
The Reception
Creating The Invitations
DIY Ticket Booth
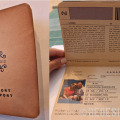
Passport Guest Book
Stenciled Burlap Table Runners
Our Wedding Cake Alternative
Traveling Trunk Prop
DIY Photo Booth Props
Out of Town Gift Boxes
Organize Your Wedding Mementos
Tips For Planning Your Engagement Photo Shoots


The bunting looked great at the wedding and was a superb touch. However, I am not sure I can forgive your messy workstation
Ha ha! *so embarrassed*