
Getting built | The mock-up
As our invitations were in the form of train tickets, we had to use them authentically, so a ticket booth we built! Mr. M’s cousin was the designated ticket attendant who took the guests’ tickets and confirmed their “seat reservations” (aka checked their name off the guest list). Ha!
The ticket booth had to be a freestanding prop because, you know, you can’t damage any part of the venue lest you don’t get your security deposit back. It also had to be lightweight enough to be portable and big enough to look imposing when the guests walked in (and also for the ticket attendant to comfortably hang out).


Here are the sketches for the ticket booth project. The front side was the window for the ticket attendant; the left side was the doorway for the ticket attendant to enter and exit; the right side was the seating chart; and the back side was closed off with the guest sign in table.
As you know that I like to share my mistakes as much as my successes with you, I will be quite honest that this ticket booth was a nightmare to build! Firstly, the 4×8 boards I got were TOOOOO thin and warped super easily. You can see the bad warpage if you look closely enough. The original idea was to hinge the boards together so that the booth would fold and unfold like a screen. While the ideas in my head were brilliant and the sketch I drew up was perfect, the reality was that the boards, as thin as they were, were still too heavy when you piled three on top of each other. No way was this considered “portable.” OK… plan B.
Uhhh… what plan B??????
OK, back to plan A. With a few modifications.
Instead of hinges, we screwed in blocks on the inside corners. And it stood! So we jumped over that hurdle (thank God). Then we did the mock-up of the curtain panel in the back of the ticket booth and hung up the Directory board (aka seating chart) on the side. At the end of the day, it only needed to remain standing for a total of two hours. And it did!!

Ticket window | Seating chart | Passport guest book | Guest sign in table
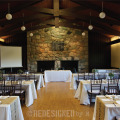
When the guests walked in, they were immediately greeted by the ticket attendant, who took their train ticket, checked their name against the guest list, tore off the ticket stub, and instructed them to find their seat on the directory (which was a world map that marked some of the places Mr. M and I traveled to together) and to check their coats at the Left Luggage. There were ushers standing nearby to help them find their seats, after they signed into the Passport Guest Book. It was all so wonderful!
Total Time: With the help of our friends, we were able to get the ticket booth cut and painted in a few hours. The mock-up took about three hours to work out. Putting it together on site took about half an hour, using two men. (This, of course, does not include the months we put the ticket booth aside trying to figure out how to best make it stand while working on other wedding DIY projects.)
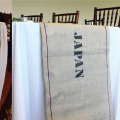
Total Cost: The biggest cost of the ticket booth was the plywood, but our friend was able to get them for us at no cost, saving us about $60! The fabric panel at the back of the booth was purchased from Joann’s for $52.54 (taxes included, of course). It’s on the pricey side, I know, but I loved the pattern so much! And it can be used again for other projects. The seating chart was $4.27. I only had to pay for the world map (it was a decorative gift wrap sheet from the art store) as we already had the frame and the burlap was a remnant from the table runners.
If you missed any part of the Project Wedding series, you can view them here:
How It All Began
The Ceremony
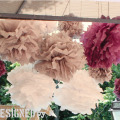
Pom Poms and Fans
Tin Punched Candle Holders
No Sew “Just Married” Bunting
The Dress
DIY Hair Fascinator
The Reception
Creating The Invitations
DIY Ticket Booth
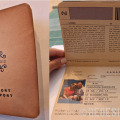
Passport Guest Book
Stenciled Burlap Table Runners
Our Wedding Cake Alternative
Traveling Trunk Prop
DIY Photo Booth Props
Out of Town Gift Boxes
Organize Your Wedding Mementos
Tips For Planning Your Engagement Photo Shoots
Wow! I love that Idea. I’m going to have to send it to my sisters who are genetically gifted in the area of design and cool ideas
Thanks Inge! It was one of my most favorite ideas from the reception. Wish you had been there to see it in person! xx