Now that I’ve finished my pantry, I’ve moved onto other parts of my home to organize and make over. The next room I’m tackling is the linen closet. I pulled these plywood shelves from the closet. I think they are maple, unfinished.
When I first moved in, I attempted to make them look decent by laying some shelf liner and painting out the edges so they weren’t so just-because-it’s-a-closet-we-can-neglect-how-it-looks looking. That’s why there’s all that white paint around the edges. That was my doing.
Well, the linen closet the way I originally set it up would have been fine if it weren’t for the fact that our needs changed and the organization system I had created for this space got all ruined through the course of usage. So, what did I do? Yes, that’s right. I took EVERYTHING out of the closet, shelves and all!
Now, I did mention previously that my pantry is the best room in the house because it’s the most functional and decorated. I don’t want that room to always be the best room in the house. I want all my rooms to be equally amazing. There shouldn’t be any playing favorites here! The anal perfectionist side in me kicked in and one look at these bare plywood shelves told me that they weren’t going to stay that way any longer.
A little browsing via Pinterest gave me the inspiration to give these shelves a faux finish to resemble weathered barnboards. Thank you so much, Shelly of The House of Smiths, for your tutorial! Check out her post for a detailed guide of how to achieve this finish. Using leftover paints found in my house, here’s my version of turning these shelves from drab to fab.
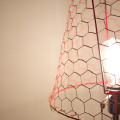
Image 1. Here’s a close-up of the original shelves. Very plain maple plywood. I sanded down the shelf first as it was unfinished and slightly rough to the touch.
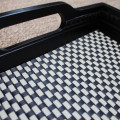
Image 2. The first coat of color was given with a semi-solid stain, applied with a rag. I used Benjamin Moore Dragon’s Breath. The color stained very beautifully and this could have been enough to visually transform the shelf, but I was determined to go through with the weathered barnboard finish.
Image 3. After the stain dried, I used both sides of a hammer to bang up the board at random. I didn’t bother to use anything else to it. At first, I thought this step was pointless because I couldn’t see the dents. Then, using a wide paint brush, I brushed a very light coat of white paint over the surface and the divots showed up! How wonderfully distressed this board looks now! Be careful to not load up a lot of paint on the brush. You want to barely graze the board with streaks of white. It’s best to dip your brush in the paint and then dab off on your drop cloth or a rag before brushing it on the board. So as not to get random start and stop brush strokes, I dragged the brush the full length of the shelf from one edge to the other. I used an untinted white latex paint for this step.
Image 4. I didn’t bother to wait for the white paint to dry before applying the next layer. There was so little of the paint on the board that it didn’t make a difference. Using the same light paint technique as described in Image 3, I applied the next layer of paint. You can see at the bottom of the photo above where I used too much paint on the surface, resulting in a large blob of color. I wiped off as much color as possible with a clean rag, which was OK, but not ideal. The color I used for this layer was General Paint Sweatshirt.
Image 5. We’re almost done! Again, not waiting for the paint to dry, I ran a third layer of paint onto the shelf, using the same technique. Here, I used Benjamin Moore Iron Mountain.
Image 6. And just so the paint streaks aren’t too defined, I gave the board a rub down with a clean rag, resulting in a very weathered finish, as shown in the image above on the right. The image on the left was pre-rub. Lastly, I sanded down the board with a fine grit sandpaper just to smooth out the hairs that raised during the staining and painting process.
What do you think of the barnboard finish? I’m quite tickled at how pretty the shelves look now… a vast improvement on the original, I think.
Total time: Doing seven shelves, both sides, took a total of four hours. The longest wait was the couple of hours I waited for the stain to dry.
Total cost: Nothing! The shelves came with the house; all the Benjamin Moore stain and paints were free samples, the General Paint gray paint and untinted white paint were leftover paints from other house projects.
See these shelves installed:

I’d love to see what they look like installed! Nice work!
I will definitely post the finished closet when it’s all complete. I just hope these shelves live up to your expectations! *biting fingernails* Thanks for the comment!
Looks great, I love the colors you used! One thing I do after “weathering” a board is run over the board with a 120 grit paper on my orbital sander. It helps let the grain show through.
Thanks for the tip! I’ll definitely keep it in mind next time I tackle any more weathering.
I Love your blog! I Love the way the wood turned out…great job! Do you have any advice for me on setting up my blog~ I love the way you’ve done yours! I find it confusing and I’m kind of stuck! *I’m a newbie!
Thank you so much! I, too, am a newbie as I’ve been blogging for less than a year, so not sure I’m the best person to ask. However, I will tell you that I thought of a concept for my blog layout before getting it set up. I still haven’t worked out all the kinks, so busy I was to get content on my site. I looked at your blog and the set up isn’t so bad. It really depends on what you are trying to achieve… think of how the reader will see it. Can the reader navigate it well? Can the reader find all the necessary information? Do you have links to your older posts? For now, I think your site is very user-friendly, so the appearance is really up to you. Play with the “appearance” in your dashboard and just click on everything to see what it does. That’s how I learned! Also, if you like the layout of another person’s blog, find out what template they used and see if that will work for you. I did a little customizing on my template, so it doesn’t look like someone else’s with the same template. Hope I’ve answered your question! Let me know if you have any others. Be happy to help. ~M.
Thanks for the advice~ I took it! I played with the “appearance” and made a few changes! I had tried to figure things out and couldn’t, and your advice was Just what I needed…!
Excellent! Always happy to know that my advice helped. =) ~M.
Great technique! Looks really good. I’ll have to try this if I ever get the chance.
If you do, let me know how it turns out! ~M.
love the color. i’m curious to see how it matched the rest of your room and the corresponding colors that you used. seems like you have a knack
Ahh! You’re not the only one to have wondered that about these boards! I have really got to get to work on finishing that space! ~M.
I’m not into barn board, but I definitely appreciate how well you documented this! If I’m ever inspired to try it yours are the instructions I’ll look for.
Aw, thanks! That’s a great compliment! ~M.