
Can you believe the first month of 2015 is just about over? I’m kind of excited to be moving out of wintery Vancouver and onto the spring. I can’t wait to get back out in the garden! But for now, I’ve got plenty of projects indoors to keep me busy.
Around the house here, I’ve been working on creating a command center in my kitchen. Unfortunately, all I’ve done so far is to paint one wall with chalkboard paint. I know the command center needs a functional calendar, but I can’t seem to make one work for us. So, I’ve made another attempt at the calendar and I’m hoping this one will stick! (haha - get it?)
Some key changes I’ve made to the new calendar:
♦ Made it bigger (for more writing room)
♦ Gave it magnetic properties (to stick notes to it)
♦ Switched from dry erase writing to chalkboard writing. (this was an aesthetic preference)
♦ Added an area for a weekly menu.
♦ Added an area for coupons and receipt storage.
Supply List
• Ikea Ribba frame
• 2-Joist lining (I used 16″ x 36″ pieces from the plumbing aisle at Home Depot)
• Metal shears
• Heavy duty double-sided adhesive tape or construction adhesive
• Chalkboard spray paint
• 1/4″ White masking tape (I bought this from an art supply store)
Step-by-Step

Step 1
Remove the hardboard backing from the frame. Discard (or save for later use) the paper and plastic covering.
Step 2
Cut joist lining into the sizes as noted in the above drawing. Be careful not to knick yourself on the cut edges! But don’t worry - those edges won’t be a problem when they’re fixed to the board.
Step 3
Affix the metal sheets onto the hardboard with double-sided tape or glue. See above drawing for border guidelines.
Step 4
Spray entire board with chalkboard paint. Do very light coats so the paint doesn’t puddle. Let dry completely in between coats. I ended doing four coats to get all the metal covered properly.
Step 5
Mark the calendar and menu areas with masking tape. See images below on how to get the corners perfect.

The finished product!
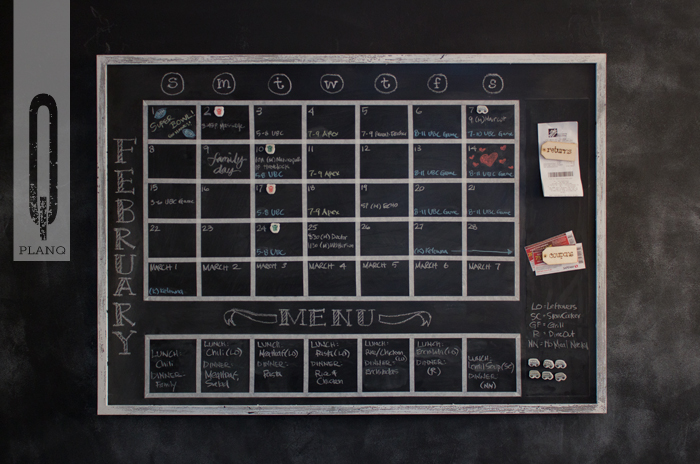
Now, allow me to explain the different elements of this calendar…

Instead of writing in weekly reminders for garbage day or who is using the car when (Mr. M and I share one care between the two of us), I made magnets that can be stuck to the calendar according to the day and be easily moved around if plans change.

It’s always nice to know what to make for dinner during the week, so we can plan our shopping in advance. On days when I plan to be home late or have to work on my blog, I can indicate it’ll be a Slow Cooker (SC) day so I can have dinner ready when I get home. Or if we have dinner plans with friends/family that night, we can mark it on the menu so I know I don’t have to cook.

This area was one of the most needed additions to the new calendar. Mr. M and I aren’t heavy coupon users, but it’s nice to have a holding spot for any important coupons we want to use when they come through. It’s also a good place for promo ads to remember. The other part that’s especially useful is the “returns” magnet. This holds receipts for any items that need to be returned. In the past, the receipts have gotten lost in the shuffle and we’ve missed deadlines because we couldn’t find the receipt. Now we have a central spot for them.
This magnetic chalkboard version is my third attempt at a central calendar for the command center. I really hope it’s here to stay! So far, it’s looking good.
Project Summary
Total Time: One full weekend. It’s the waiting-for-paint-to-dry that takes up the most time.
Total Cost: Frame $30 + White Masking Tape $2.19 + Heavy Duty Double Sided Tape $10 + (2) Joist Linings $10 + Chalkboard Spray Paint $5 + taxes = $64.05
I’ve linked up this project at these parties here.

This is too cute!
Thank you!