Greetings from Calgary everyone! Staying on top of my blog while I’m away. Here’s one that I recently finished up before my trip.
I picked up this pretty little tray at Goodwill for $4.99. I liked how basic and simple it was, a perfect blank canvas for a redesign.
I had no direction in which to take the tray until I saw these squares of silver papers with a red leaf print. I loved the paper and had no idea what I’d do with them initially, but bought out their remaining stock of 6×6 sheets and took them home. That’s when the leaf paper and the tray found love.
As I bought the paper from my favorite craft stores in Vancouver, Urban Source (see my quick review here), there just wasn’t enough material to cover the entire tray. Actually, that’s not true. I did have enough to cover the bottom of the tray IF I didn’t want to pattern match. But, of course, I did.
I almost scrapped the project entirely because I was so fixated on pattern matching and short on materials. Then I found a solution and it was all systems go from there.
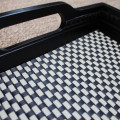
Basically, I concentrated my pattern matching in the center of the tray. I had enough paper to do a square in the center, then I kept a 1/4″ black border around the square and filled the remaining border with leftover paper, without pattern matching.
All the paper was glued down using Mod Podge. After that, I took some black paint to touch up the knicks around the edges. Looks in much better shape now!
Unfortunately, I used too much glue in certain areas and created a transparency in the paper. Had no idea this would be a problem until the glue dried. It’s not exactly a deal breaker as there will be accessories to cover them. Out of curiosity, does anyone know how to fix this problem. If it can be fixed, I’d love to take advantage of it and make this tray perfect.
Supplies used:
Tray
Decorative paper
Mod Podge
Black acrylic paint
Painter’s brush
Total time: A lot of hemming and hawwing went into this project as I tried to figure out the best solution for the lack of materials. Hands on time after coming up with the solution was about 1.5 hours. There was a lot time involved in pattern matching and coming up with the final size of the center square. Glue down went really fast as was the paint touch up. If I didn’t have to pattern match, I could’ve knocked this out within half an hour. Total does not include dry time.
Total cost: The tray was $4.99 and the paper was $0.75 each. The paint was leftover from previous projects. Final total was $11.46.


As far as I know, there’s nothing you can do to fix it now except cover with other paper. You could cut out individual leaves and cover up the spots you don’t like. Certain kinds of paper will become transparent. Thicker paper won’t. The natural fibers in your paper are really absorbent and that’s why it went clear. Glossy and thicker papers will be less likely to become clear.
Having said all that…….I really like the tray!
Thanks for all the great information! I pretty much thought it was a lost cause, but you never know if someone else has experienced it and can offer some brilliant insight! I’ll definitely keep the weight of the paper in mind next time I Mod-Podge. ~M.
Yes, it is a lost cause. Sorry. Still likethe tray though.
I thought as much. I’ll just have to stage it so no one can see the flaws! =) ~M.
M, I love the delicate effect you created with the leaves. Your patience definitely paid off. Though, I think you and I were on the same wavelength this week, I updated a serving tray as well. Happy and safe travels!
Hi Shannon! Thanks for your kind words. I took a look at your tray and it looks great! I especially liked the coasters placed in the tray. ~M.
I actually like that you can see through the paper a bit. It gives the tray that handmade quality and you can see that the paper is delicate and not some thick wallpaper. I really love following your blog, truly inspirational (I think I may have left this comment before but I can’t say it enough)
Awww, you’re sweet! To make me feel better about a botched up DIY AND to compliment me on my blog! You’re like the best reader ever! ~M.
~M.