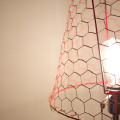
This is one of two light fixtures in my house exposing a bare bulb. It got a shade, fashioned from a shelf riser. Yes, that’s right! I saw this Variera Shelf Riser from Ikea and did not think of it as a shelf riser for canned food, but thought to myself, “I think I found my new light shade.”
Let’s assess the situation at hand. The junction box is mounted to the surface of the wall rather than recessed, which makes my shelf riser of six inches one inch too short to fit around the bare bulb. So I had to figure out a way to build out the shelf riser. I looked all around my house for scrap wood that was only 1/2″ wide x 1″ thick. This was quite a conundrum as I had none. Enter paint stir sticks.
As I had plenty of paint stir sticks laying about, I put them to use and laminated several of them together using construction adhesive. This gave me the extra depth I needed to build out the shelf riser - slash - lamp shade. Here are the supplies I used:
After that part was figured out, I had to create the shade. I thought about just keeping it open all around, but then I’d see the bulb through the risers. Plus, if I could line the risers, I could hide the unattractive paint stir sticks build-up and not worry about having to do a perfect job in that arena.
This lamp shade liner came from another project that I hacked. More on that later.
Here’s my supply list for part deux:
One shelf riser “leg”
Two shade liners
Sharpie
Scissors
Straight edge
Hot glue gun and hot glue sticks
I made a rough template of the shade by laying the riser on an unrolled shade liner. Using the Sharpie, I marked a dot at the four corners of the riser. Then I stood it up and marked two more dots on the ends. Repeat this step for all four sides of the original rectangle.
Using a straight edge, I connected the dots to make this shape. It’s basically a rectangle with square corners notched out. Then I cut this out and traced it to make a second one (for the other leg). The bottom of the shade was drawn up using the same process. The top of the shade was left open as my light fixture is too high up on the wall for any to see over it. After all the shade linings were cut, I folded the tabs in on all four sides.
Unfortunately, I don’t have photos to outline the next steps as this was all done instinctively. There was a bit of trial and error to get it right. When the tabs of the linings were all folded in, I hot glued the tabs to the inside of the metal legs. The legs acted like a frame to hold the shade in place. Then it was all screwed into the wall encircling the bare bulb. Because I left the top of the shade open, I don’t have to take down this shade to change the light bulb!
The final product in its light on and light off states.
Here’s the detail of the paint stir sticks build out. Everything fit really well!
I apologize for the lack of detail in my photos and descriptions. If you seek to make something similar, feel free to email me or ask your questions in the comments below. I’ll do the best I can to explain things!
Total time: It took about fifteen minutes to laminate the stir sticks between Mr. M and I, then I let them dry overnight. Creating the light shade took about an hour and then it was about another hour to test fit everything and install it.
Total cost: I bought the larger Variera shelf riser, so that was $7.99. The stir sticks were free as well as the lamp shade liners. After taxes, this was a total of $8.95.
That looks great both with the light on and off. Good job. I wish I had more incentive to make stuff from scratch like that!
Haha… sometimes I think I create more work for myself than necessary. In this scenario, I just couldn’t find a sconce shade to fit the light fixture no matter how hard I looked, so I had to DIY it!
Great work, I wish I was able to make anything useful! The most I can manage is very holey scarves!
I’m sure that’s not true! Follow my blog and I can show you some great tutorials. Then you’ll gain the confidence to make anything you want! PS. I can’t make holey scarves. Yet. ~M.
Thanks for the great tutorial. What a neat project!
Thank you! I’m glad you found it helpful. ~M.
Very clever! The step-by-step instructions will be useful for any similar projects I undertake.
Thanks! Let me know what sort of projects you come up with using this tutorial. ~M.
Great job!!! Looks so good. You have a great eye for repurposing…
Aw, thanks, Uyen! I really enjoy it, so I’m very pleased to hear others have taken notice of my efforts. ~M.
Great idea! I would love to see how this project fit in with the styling of the rest of the room. I also appreciate the ‘cost of project” tip at the end, at a glance you can consider if this is something to do right away or save for later.
Thank you! I find when reading other blogs that I’m always curious to know how much they spent on their project as I’m such a cost conscious person. Makes me wonder if DIY is worth it for that project, so I made a special point to note it in my blog so others might be able to benefit from it as well. I’m glad to know you appreciate my extra effort in keeping track of my pennies. =)
As for the room styling: this lamp was designed for my pantry, which you can have a tour at this link here: http://redesignedbym.wordpress.com/2013/03/22/pantry-makeover/ Hope that satisfies your curiosity! ~M.
Fits great in your pantry space. You ARE lucky to have a pantry. I am still dreaming of one in a future home. You fit a lot of practical and cute in that small space. Nice!
Thank you so much! I still love that little room. ~M.
This is such a clever idea, you must have some imagination to come up with a solution like this. Great job!
Thanks so much! I’m not sure if I’m very imaginative in the whole grand scheme of things, but I know I love to create, so I just keep my eyes and my mind open at all times. ~M.
Thanks for likeing my diy post at “theworminmyapple.com”. Looking forward to reding more of yours.
This is such a clever idea! We are big fans of people making their own lampshades, but your take on that is super creative. Nice job, the finished product looks so pretty!
Thank you so much! ~M.