I’ve been coveting an upholstered headboard for as long as I can remember. The least expensive one I could find for our king-sized bed was through West Elm for $599, plus taxes, plus a $60 shipping surcharge. However, I live in the Great White North and West Elm just does not ship this item to Canada. Darn!
Thanks to all the helpful DIY tutorials out there, I was able to create my own headboard. *smiles*
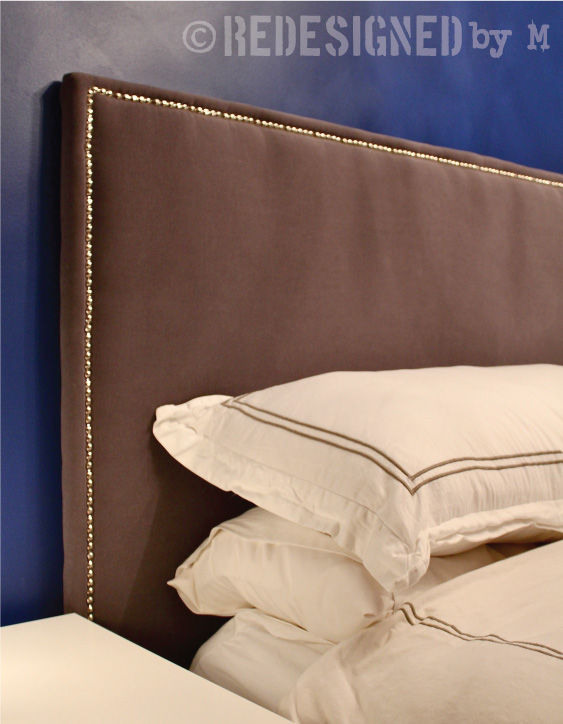
Here’s the original inspiration:
West Elm, Tall Nailhead Upholstered Headboard
The beautiful thing about DIY projects is that you can customize and control the outcome of your designs. The fabric options through West Elm were no good for me, being an anti-microfiber user, and the beige-ness of the velvet was too boring. I also chose a finish for the nailheads that was more suitable for my interior.
These are the supplies I used for a king-sized headboard:
2- Hollow core slab doors
5- 8″ mending plates & #10 x 5/8″ wood screws
1- Foam mattress topper
1- Bag of Poly-fill Batting
1- Spray adhesive
3- yards of fabric
10- yards of nailhead trim
1- Staple gun
1- Power drill
1- Hammer
Step 1: Create a board. I was able to repurpose a pair of sliding doors I wanted to discard from the bedroom closet. These could be repurposed as a table top or recycled as a new door somewhere else, but I saw a new headboard in these doors. Next, I attached the doors together with mending plates, from good ol’ Home Depot. Now I have a full sized board that measured out at 48″ x 78″. This could also be created out of one sheet of plywood if you don’t have a pair of discarded doors, which would need to be cut to size (which they can do for you at Home Depot, if you buy your plywood there).
Step 2: Attach the foam. Seeing that foam can be very expensive, I was pleasantly surprised to find a great sale on foam mattress toppers at Wal-Mart for $20. These toppers are generally 1″ thick and you need to find ones that are smooth on both sides (not those toppers with the egg crating on one side.) Just make sure there’s enough material to cover the entire size of your board as you can always cut and piece the foam to fit. When you take the foam out of the bag, you’ll get a lot of lumps and wrinkles, but fret not! With some spray adhesive (I had some left over from my art school days), spray the “front” side of the board and then apply the foam directly onto the board, making sure to stretch the material all the way to the edges and pushing out any bubbles. If needed, cut any excess material and use to piece in other areas where there wasn’t enough. Then you’ll have this step completed to look like this:
Step 3: Apply the fabric. Lay out the fabric (face down), then lay out the polyester batting on top of that. I bought my batting from Jo-Ann’s. A great tip is to sign up for their mailing list so you can get 40% and 50% off coupons. They also have great promotions on the batting alone, so if you can, wait for one of these promotions or coupons to use on the batting. The regular price of a bag of batting for my king-sized headboard is $15. Now that you’ve laid out the fabric and the batting, lay down the board (front side down). If you’re using a patterned fabric, make sure the fabric is centered properly. Then pull the fabric and batting over the edge of the board and staple the material to the back of the board using a staple gun. Make sure the fabric and batting are pulled tightly around the board as you continue to staple around the perimeter. If you’re using a pair of hollow-core doors like I did, be sure to staple closely to the edge because that’s where the solid part of the doors is.
Step 4: Trim excess fabric. With a pair of sharp scissors, go around and trim off any excess fabric and batting. I left about two inches all around.
Step 5: Secure the corners. Honestly, I don’t think I did a perfect job on the corners, but they were good enough for my needs, so I’m only going to show you my finished corner. My big tip is to do your first corner, and then your second corner would be the one diagonal from your first, making sure to pull at the corners as you staple.
Step 6: Tap in the staples. If there are any staples that didn’t go all the way in the board, go around and tap them in with a hammer.
Step 7: Add some bling. At this point, your headboard is pretty much done. But if you want to make it super pretty with some nailheads like I did, then this would be the best step of all. It was so exciting to see my plain headboard all blinged out. I used the nailhead trim on a roll instead of tapping in individual nailheads in order to save time and energy and I think they turned out great. You don’t need to apply nailheads to the bottom of the headboard as they won’t be seen and you’ll be wasting material. Do make sure to know which direction the nap of your fabric runs so you’ll know which end is the top. Also, if you’re using a patterned fabric, make sure the pattern is faced in the right direction.
Step 8: The finale. If four feet off the floor isn’t high enough for you, then you’ll need to add some legs. If you used a sheet of plywood, you can use the remaining scraps for legs. I wanted my headboard to be at 66″ off my floor (as I have a really tall bed, plus I like the drama of a tall headboard), so I attached 2-two feet legs to the back of my board. Then voila! My beautiful new upholstered headboard with nailheads! What do you think?
Total Time: 1 day
Total Cost: $99.57, including taxes and shipping. The doors were free, the batting was paid with a gift card so that was free too, the legs were made from wood scraps, and the fabric was purchased at 50% off.
Reblogged this on Upcycling ideas… and commented:
I thought this was quite something. Upcycling is such a cheap way to create something you want and most of the time ends up better than the original inspiration.
Wow! I love the nailhead detail. Very chic!
Thank you!
What type of fabric did you use for this project?
I believe it was a brushed cotton, but I want to be really sure, so I’ll have a look when I get home and respond again with specifics.
Where did you get your nailhead trim? I want to add some to a plain headboard that I made and I feel like the only place I’ll be able to get the trim instead of the individual nails is online.
Such bad form of me to not include the vendor information! Blame it on my earlier inexperienced blogging self. I got the nailheads online, unfortunately. If you’re not interested in shopping online, try calling the upholstery shops in your area to see if they have any yardage they could sell you. I agree that they’re hard to find in standard fabric stores. If you want to know where I purchased mine, let me know. I would tell you now except I have to do a little research in my old receipts (at home). ~M.
So making this! Love that you laid it all out for me and I have referred to it during my shopping….I found doors at a Habitat for Humanity Re-Store for 5 bucks a piece, and the nailtrim I got at Joann’s craft store…luckily I had a coupon for 50% off so I bought I package and my daughter downloaded the app and bought the other one…so it was 21.99 for both..and upholstery fabric 30bucks for 4.5 yards…from Old Time Pottery..remnants cant be cut.. but its a great find @5.99 a yard. You have definitely sparked my inner DIY diva!
Hi Leslie! So glad I inspired you; it’s truly a high compliment! I’m so excited for your project to come to life. Please send me photos of your finished headboard. Hope some of my other DIY projects will make their way into your home also. ~M.
I finished I posted a pic on instagram…going to tag u so u can see…I love it my girlfriends are all hyped to make something! You made it easy to follow and find the items…it cost me about 125 total including having to buy a stapler and staples..and adhesive. Much better that 600-700 still!
Wow Leslie! That’s so wonderful! I’m really happy to hear you think my directions were easy to follow. In my head, I think they are because I know how I did it, but it’s truly gratifying to hear that others really can use and (in your case) have used them to go forth with their own DIY. Can’t wait to see the photos! And yes, your final cost is still MUCH better than $600! Now you have tools you can use for future projects – call it an investment. =) ~M.
LOVE IT!!! Have been wanting to try this for a while so thank you for your super easy to follow tutorial! bookmarked! xx
Awesome! Let me know how yours turn out! ~M.
Will do! xx
Very nice! I’ve been wanting to do this for a while but was intimidated. You made it look pretty easy, thanks!
It wasn’t difficult at all! If you do use hollow core doors, do remember to keep the screws and the staples within an inch near the edges. That’s where the solid part of the door is. Let me know if you run into any problems once you gather all your materials and decide to tackle it. I’m happy to walk you through any kinks in the process. ~M.
Thanks for the tips and offer to help in the future…i’ll let you know if I go for it
Love this! My hubby and I currently have a wood/frame headboard…but I can’t wait to someday replace it with one like this. Thanks for these helpful tips!
Thank you! I love my headboard! I hope my tutuorial will be easy to follow for you. ~M.
Hi, I’ve just come across your blog and I’m loving it so far…and it was just a very happy coincidence that I’ve been wanting to make a DIY bedhead for a new mattress that we just purchased.
Thanks and I look forward to checking out your other posts.
I’m glad you enjoy the blog! Hope my tutorial is easy to follow for your own headboard. Let me know how it turns out! ~M.
Thanks for making this look so simple! I want side rails upholstered in the same fabric…any ideas there?
I think it depends on the rails. Do you have photos you could email me? You can find my contact info on the WHO page. ~M.
I know this project was finished over 2 years ago, but hopefully you still remember a small detail about it. Did you find any difficulty getting the nailheads all the way thru the foam batting and into the doors underneath? I love this but am wondering if I need to leave a 1/2 inch parameter on the edges of no foam and then wrap it all in batting after that so that the nailhead will for sure get a good hold and stay out. Any thoughts on that?
There should be no need to leave a border without foam. The nails that come with the nailheads are about 1/2″ long and they go through the fabric, foam, and door without any problems. Just need to bang them in all the way. Hope that helps! ~M.