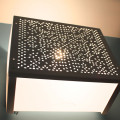
When I first moved in with my husband (who was my boyfriend at the time), he had a gray LACK table from Ikea that had seen better days. I told him to get rid of it. So what did he do? What every loving boyfriend would do! Store it in the garage. smh
Fast forward four years to 2011. Now we’re engaged and we bought a house. Things were getting moved over from the old place into the new place. That’s when I found the old gray LACK table. It was irritating that he didn’t listen to me, but by this time, I had learned about Ikea hacking (didn’t know about it four years ago), so I hesitated to dump it during our move. Plus, I didn’t know if we could use a side table somewhere in our new place. It moved to our new garage in our new home, where it sat for several more months until I got around to redesigning our front entry.
Mr. M and I are a household who removes their shoes when entering a home. Naturally, we had to find a way to store our shoes in the entry, not just for ourselves, but for all our guests also. And on many weekend nights, we can have upwards of ten of our friends over. Shoe storage was very key.
This is another situation where none of the pre-fabbed products worked in our home, so I had to create a system designed specially for us. Enter that old LACK table. I saw a way to give it new life through upcycling.

The LACK table, when cut in half, was the perfect depth to hold shoes. The thickness of the table top made a substantial looking shelf that would be good-looking and functional. I found two more tables on Craigslist, although not gray. They were white, so I made them work. I created my entry around these gray and white shoes shelves.
The legs were unscrewed from the table tops and saved for another project (which will be revealed in a future post). The tops were cut in half and I trimmed off the width to fit into my 18″ wall space. Each half was screwed into the wall. I would have liked the shelves to appear floating, but I couldn’t be bothered to rig up a mechanism for these corrugated cardboard shelves (that’s the best description I can think of for the interior of the table tops). That’s why I bought the smallest brackets I could find.
I spaced the shelves equally apart from floor to ceiling. Each shelf holds exactly two pairs of shoes. Including the boot tray on the floor, my front entry now has storage for at least twelve pairs of shoes, fourteen at the most. When we don’t have visitors, the shelves can be used to store a basket of gloves, scarves, and hats.
Total time: This project took about 90 minutes to cut and install.
Total cost: The gray table was free as we already had it. The white tables were purchased for $6 each from Craigslist. I had to make two trips to Home Depot for the brackets as I didn’t have enough. On the second trip, I went to a different location and they didn’t have the brackets I originally bought, but I was able to find other brackets that were suitable for nearly 1/4 of the price! Arrgh! As it was, I spent a total of $16.82 on the hardware alone, which brings the total of the shoe shelves to $28.82.
Did you enjoy this project? Then don’t miss out!
Subscribe to get free email updates.
Love this idea for a corner…sometimes corners space is so hard to work with! Great job
Thank you! I completely agree about the corner spaces, especially this one because it was only 18″ wide.
What a great idea! So glad to find your blog today - so many great projects & creative decorating ideas!!
~Laura
What a great compliment! Thank you!! Reading this totally made my day. I hope I continue to inspire.
Brilliantly done, and so slick and modern looking. I love it.
Thank you! I was totally going for slick and modern, so I’m glad you thought it looked as such.
M,
I love this. The mr. and I live in a tiny 1920’s bungalow and we have a lot of shoes. We recently began thinking about starting a family so my shoe bedroom will be turned into a nursery. We have lots of little corners though! Might have to try something like this! Thanks for the idea!
So happy to read that this post made you see your corners in a different light. Be sure to let me know how it all works out. Thanks for the comment! ~M.
Being Swedish, I’m naturally a fan of IKEA and love your makeover of the shelf.
Thanks for liking my DIY batik blog at http://www.shoebox-living.com. Pls find me on blog loving ! Xxx
Thanks for leaving a comment! I’ve never heard of blog loving until I started this blog. Will have to check it out and see what it’s all about!
I didn’t know about it either but its quite useful way of managing all the blogs you are following. I signed just added it to my page
oooh, another one i need to try. you make me want to buy a house!
Haha… I’ve been feeling the same for ages! When I finally bought a house, this blog was what happened. All that creativity I’d kept bottling up was just bursting at the seams! ~M.